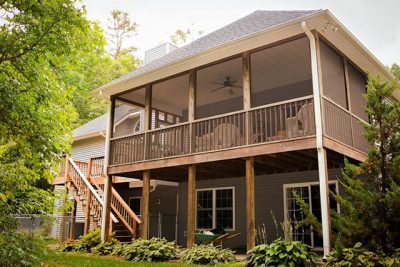
How to Pick the Right Paint Color for Your Home Deck

Aside from your good painting experience, choosing the right color to paint your deck is very essential. When you do this in an appropriate way, the deck color will beautify and restore your residential area. However, when you work it out the wrong way, the results will be a total disappointment.

Right Paint Color for Your Home DeckTo help make your home look like a paradise, here are the simple thinks to consider while selecting a color for your deck:

Exterior color of your house

The visible color will guide you choose the right color for your deck. When you have different types of colors already existing, you should make sure that your deck color blends well with other colors. It should not be interfering with the flow of other colors.

Components of your deck

The material of your deck equally matters a lot. Choosing the right color for painting your floor will depend on the materials used that are wood, composite, stone bricks or clay bricks.

Try out

Try to experiment with different colors to see how best they can fit. Purchase different colors and paint them in small sections outdoors where you can examine them at various times of the day. View them together and check out which blends well.

Which parts of the deck are frequently in use?

Despite the fact that this can be a surprise to you, keep it in consideration. It comes about due to friction, which causes wearing and tearing of the surface. For example, the entryways have higher foot traffic than the case supporters. Hence, consider the color stains you apply to these areas appropriately to avoid frequent maintenance demands.

Rules for color schemes.

For instance, your house is located in between neighboring houses with brighter colors. Concurrently, you will need to select a deck color that will not clash with your neighbors. It is better to choose a scheme that suits and blend well with the others.

You can also come up with your color scheme. Considering which type of material used to make your deck is a necessity as it also affects the layer color. For example, different types of woods have a different effect on how stain will appear on them.

Stains will appear in many ways depending on the color and opacity you select. A transparent stain will let the natural color of wood glow while tinted will just allow a little. Consequently, a solid stain will let the minimal color of wood appear.

Landscape

You should consider surroundings like trees, gardens and shrubs around. A more wooded landscape will bring shade to your home a dull color for the deck can be preferred to match. However, a flower garden may suggest a bright color for the deck.

Furthermore, you should also consider the rays of the sun. Direct rays from the sun will clean out colors. Hence, bright colors will better suit in a shaded region.

Deck colors

Well, I think you are now able to select your deck color that will suit well. However, we always leave out something for our readers to perfect their skills. Here are some of the clues that can motivate and lead you into choosing your right color.

  • For a small area, a dark color scheme such as black or chocolate brown is preferred. They do well there and may dominate to a great space.
  • For homes decorated with cottage or Cape Cod, dark blue is preferred. Moreover, it works well with other additional colors such as purple and pink.
  • Green is the most used color. It blended well with most homes and associated with others like red and black.
  • For warm color schemes, gray can perform better. Simultaneously, such a dull tone will not show dirt easily.
Read More

Oil-Based Painting 101 – What You Should Know Beforehand

Painting with Oil-based paint is simple but not easy. There are some tips and ideas you need to know beforehand for you to get the desired results.

  1. Slow Drying.

Oil-Based PaintingEngaging in the slow drying of oil-based paints is notorious, majorly because one constantly has to sit back and wait for paint to dry. 8 hours is the least amount of time for which the oil based paints can take to dry, unlike the latex paint that takes about 2 hours before the recoating process begins. The whole idea of this slowing down the process may sound problematic. The advantage here is that the slow drying process creates a smoother finish by allowing the oil-based paint to flow, allowing brush marks to level out on the surfaces hence the smooth finish.

  1. Excellent ventilation.

The kind if ventilation needed for oil-based paint is much better than that required when working with the latex paints. An open window and a fan in the doorway to allow fresh air into the room is a requisite. The high VOC content in the oil-based paint is much greater than in the latest paint and thus, the need for excellent ventilation.

  1. Yellowing in the darker areas.

The use of oil-based paints in the more shaded regions of the house such as the closets leads to yellowing of the paints. The light colored ones are also notorious for turning yellow as they age and when used in the dark areas. The remedy to this is just exposing the paint to sunlight, and the yellow color tends to fade away. Today’s oil based paint colors have improved color retention abilities, but they still turn yellow.

  1. Prone to mildew.

An outside use of the oil-based paints leads to the attraction of the mildew. The paints containing high amounts of linseed oil are the most popular when it comes to mildew attractions.

  1. The particular type of brush is a requirement.

The oil based paints require a unique kind of brush and many at times it needs a different brush from the latex based paints. In as much as some types work well with both the latex and oil based paints, the natural bristled brush works very efficiently for the oil-based paint. Be sure to order the particular type of brush.

  1. Hard finish.

The hard and durable finish of the oil-based paint on enamel paint is an aspect paint that manufacturers always try to achieve with latex paint. The oil based enamel paint is best suited for the moldings, trims, and doors with no other paint suitable enough to substitute it.

The sticking aspect of the latex paint is also not a problem with it based on the hard finish also making it suitable for the windows as well. The flexibility of the oil based paint is tiny compared to that of the latex paint and hence the chipping and cracking as it ages. The irregular surface expansion, as well as the temperature fluctuations, usually leads to the eventual cracking.

  1. Difficulty to clean up.

The cleanup activity of the oil-based paint is more involving compared to the latex paint. It is impervious nature to water calls for the use of mineral spirits or a paint thinner to clean the brushes.

To use mineral spirits;

  • Excellent ventilation is a necessity.
  • The used ones are disposed into a metal container that is sealable.
  • Repeat the process until the eventual mineral spirit is bright and the brush is clean.
  • Due to the hazardous nature if the cleaners, they are to be disposed at drop offs of the hazardous waste.

Another thing about the water and oil based paints is that they can and will never mix. This not about mixing the water and oil based paints into a can but if applying an oil based paint on a latex one then priming is a must on the latex paint.

The contraction and expansion rates of the two paint differ significantly and as such addition of the oil based on the latex paint without prior priming leads to an eventual and very fast falling off of the top paint due to the underneath flexing of the latex paint affecting the lately added oil based paint.

It is possible to have a latex paint on the oil-based paint without priming and still achieve great results, but it is a gamble. Priming is necessary to be safe and whenever one is switching from one particular type of paint to another.

Read More

Painting Life Hacks for a Cheaper and Cleaner Painting Project

Here are some very helpful tips for a more inexpensive and seamless painting project:

Aluminum

Cleaner Painting Project
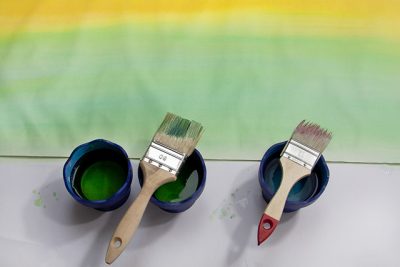
A dry paint layer is a common occurrence in an experience in which one opens a container of paint. However, this is not charming to find, as it is often likely the paint solids will find their way to the paint itself. To solve this roll aluminum foil around the paint can cut the circle off precisely and put into the paint surface. Blow air into the can while you put back the lid, preventing drying.

Aluminum pie puns

When a painting project pops up, put the pie pan made of aluminum under the dry layer of paint, as you make ready the drip catcher. A lot of cleaning time saved as you can quickly trash the pan. Recycling is an option as it is possible to wash and preserve for future use.

Basters

Transferring of the paint from a larger to a smaller can is one of the toughest parts of the paint job process. To simplify the job and avoid spill, only use the busters to transfer the paint. If possible, it should be one of the painting tools in the workshop for solvent transfer as well as the liquid chemicals

Bottles

To avoid paint splatter during a painting project, making a hole opposite side of the gallon handles help in the creation of a neat paint dispenser. Add the color to the gallon to about an inch away from the created hole. The hole is used to eliminate excess paint from the painting brush before lifting. Cutting the gallons at about halves also creates a can that can be used as a bin for the disposables should many people be involved in the same project.

Buckets

For you to avoid spilling paint as you climb ladders, a huge bucket can house all the painting equipment like the knife putty rags and a scrapper and to hang the brush and the buckets, use the paint can hooks. The more the tools and the equipment the larger the bucket should be.

Coat hangers

When on a ladder and one hand paints while the other holds on, what holds the paint can? From the wire rack, cut about an inch of a hook using a pair of wire snips, then twisted firmly around the paint can handle, thus creating a handy hanger.

Coffee cans

After a day’s job, the coffee cans provide the ideal tool to house thinners in which the brushes can be soaked when planning for the following day’s job. Create a perfect space on the lid and insert the brush until a half-inch gap exists between the bristles of the brush and the base of the can. Suppose it has no lid, suspend the brush making sure it does not touch the base of the can.

Garden hose

Cutting a small section of the garden hose and then carefully cutting along the obtained piece helps create a tool that totally prevents getting cuts from the thin wired paint can handles.

Ice scraper

Sometimes paint spills usually find their way onto the acrylic bath tabs. Scrubbing these off safely without having to scratch the surface of the bath tab, involve the use an ice Scrapper.  It also works wonderfully on any other non-metallic surfaces.

Kool-Aid

To change the color of a water-based latex paint, mix different unsweetened flavors of Kool-Aid. Moreover mixing water with unsweetened Kool-Aid creates different watercolors of your choice. Its stains though can be tough to clean and should not be given to kids.

Margarine tubs

A little touch up on the walls without having to drag around huge gallons of paint, it is advisable to pour a little paint into a margarine tub and carry it along in the touch-up activity. Wrap around clothing to act as a landing ground for spills. Store leftovers in containers that have lids.

Masking tape

The groove of the paint can be filled with paint and avoid this, use a masking tape to cover the rim’s top.

Milk cartons

If you do not want to save the paint leftovers after a small painting project, an empty carton of milk will be useful as a hole created on the top of the box, and paint leftovers poured into the container and then taken to the trash can for disposal.

Newspaper

Its needles to buy the carpenters rape or the thick masking to cover the frames and the glasses during a painting project so as to avoid spills on those particular areas. Instead, pick the newspaper leaves, wet them, and stick it on the wooden glass frames. It adheres well, and it is easy to remove after the job being cost effective band time saving.

Paper bags

It is pointless to make a mess each time you spray paint an item. Instead, fit the object in a large shopping paper bag and spray it away. The kit contains the excess paint spray and once dry, remove the item while tossing the paper bag in the garbage can.

Paper plates

These can be put on the paint can when scraping the paintbrush on the side of the paint can to avoid it dropping on the floor.

Petroleum jelly

When painting and the removal of all the metallic handles and items are not much of an option, application of the petroleum jelly is necessary on these metal items because with that; paint will not stick to them. After the job, simply wipe it all off and it will be back to normal.

Plastic bags

When taking a lunch break and you tend to continue, one does not have to clean the brush and instead you can stick it in a plastic bag, and it will be just wet enough to keep when you return. When taking a long break, freeze the bag of brush and defrost a day before using again.

Plastic lids

In the case of redoing a ceiling and paint spills in one’s face is an issue,  making a small hole on the plastic cover and then forcing the brush through creates a shield. With that, it helps hold the paint spills that could have otherwise reached one’s face. Still, one should take note not to put too much paint while working on points above the head.

Rubber bands

The mess created by excess paint on the brush can be removed on the side of the can. A rim filled with paint ends up spilling during little movements. Avoid such by fixing a rubber band across the top so that excess paint on the brush falls back into the can when hitting on the rubber band.

Vinegar

Paint on cement peels after a while. Treating the floor to white vinegar before paint application helps keep the paint on. The vinegar is to dry before the actual painting process begins. This powerful technique helps keep paint on galvanized surfaces.

Read More